Tracking interactions between customers and your ecommerce store is essential if you want to gauge the performance of your business. However, it’s not always obvious which interactions you should be tracking. If you track too little, you’re not getting the most representative picture, and if you track too much, the important data gets buried.
In order to drive revenue effectively, it’s vital you understand the performance of each of your site’s touchpoints. By identifying key goals and events through Google Analytics, and standardizing their reporting structure, you’ll be able to leverage that data to create campaigns that promote engagement and growth.
To help, we’ve created the ecommerce business owner’s guide to Google Analytics event tracking. With this guide, you’ll know which tracking events are most important and how to create tracking goals for your ecommerce store.
Google Analytics Event Tracking vs. Goal Tracking
Google Analytics event tracking can illuminate patterns in user behaviour that you can use to make more informed decisions.
Finding out how customers and leads are interacting with your online store is crucial for optimizing your customer experience. As it happens, you can learn a lot about how customers are engaging with your store by tracking goals and events in Google Analytics.
Events
As Google defines them, events are “interactions with content that can be measured independently from a webpage or screen load.” This includes things like:
- Clicks
- Video views
- File downloads
- Code loads
- Page scrolls
- Account logins
- Media shares
- Products added to the shopping cart
In a more technical sense, events are interactions between users and your ecommerce store. This includes:
- Mouse interactions
- Keyboard interactions
- Frame interactions
- Form interactions
In Google Analytics, event tracking can illuminate patterns in user behavior that you can use to make more informed decisions and further refine your customer experience. While certain events — like abandoned carts, for instance — are often tracked by default, you can track many different customer interactions with Google Analytics custom events.
Do you run an ecommerce store that isn’t seeing the organic traffic you expect? Learn more about how to optimize your Ecommerce SEO.
Event Conditions
Google Analytics has four conditions for events: category, action, label, value, and non-interaction. Each type of event condition has its own application, whether it’s for organization in Google Analytics or for assigning monetary value to a trackable event.
An event category is a name assigned to a group of events. They’re used primarily for organizational purposes. For example, you might assign events like pageviews and clicks to an event category called “engagement.” Or you create an event category called “downloads” for events related to the downloading of files from your website.
An event action is a certain type of event that you want to track for a specific page element. For example, when users click play, pause, or rewind, or scrub through a video to a particular location, you can track those interactions as event actions.
An event label is an optional name assigned to a certain element on a webpage. Similar to event categories, event labels are largely for organizational purposes. For example, if there are multiple PDF files that can be downloaded from your website, you could use event labels to distinguish downloads of one PDF file from others.
An event value is an optional numerical value assigned to a trackable event. Although value is often a monetary value, meaning how much (in dollars) an event brings to your business, there are cases where value could be a length of time or raw quantity. For instance, you could make the value for a confirmation page event equal to your average transaction value since you know (on average) how much your business makes from each conversion.
The non-interaction condition is applied when an event is non-interactive. When the value for this condition is “true,” the event is considered non-interactive. Typically, you only classify an event as non-interactive when you don’t want it to affect your bounce rate or other metrics in Google Analytics.
Goals
Google Analytics goals are essentially events that have value and that you want to boost in order to generate more revenue. When you set a tracking goal, Google Analytics begins counting instances of that goal as a conversion. For instance, if you set a duration goal of five minutes, and then a visitor spends 5 minutes or more on your site, Google Analytics will consider that a successful conversion.
In Google Analytics, there are duration goals, destination goals, pages/views goals, and event goals. As you’d expect, a duration goal is a minimum amount of time that you want users to spend engaging with your website. Destination goals refer to when users visit a specific page on your site like a thank-you page or an order confirmation page. With pages/views goals, you want users to click onto a minimum number of pages on your site. Finally, event goals are more specific interactions including form fills, click-to-call link clicks, and file downloads.
5 Google Analytics Goals and Events You Should Track
Tracking goals and events is an effective way to gauge or boost the performance of your ecommerce business. So let’s go over some specific Google Analytics goals and events that you should be tracking.
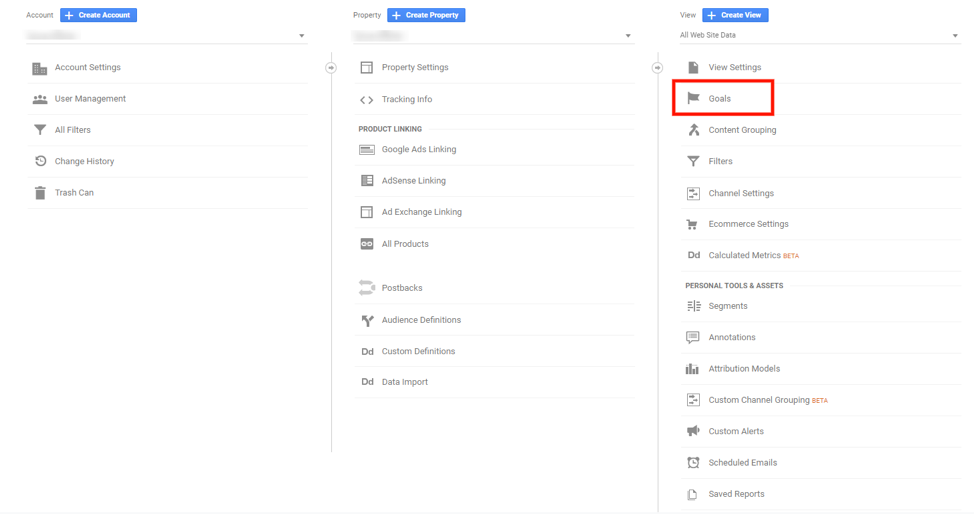
Google Analytics makes it very easy to access and create goals. Once you’re logged into your Google Analytics account, go into the Admin menu and in the View column, then click Goals.
Goal: Confirmation Pages
A confirmation page can be used to confirm an order that’s been placed or to thank a lead for joining a mailing list. But in any context, a confirmation page is what someone sees after an interaction with your brand or company. In other words, it’s a conversion follow-up that makes confirmation pages an important goal to track.
How to Set up a Confirmation Page Goal
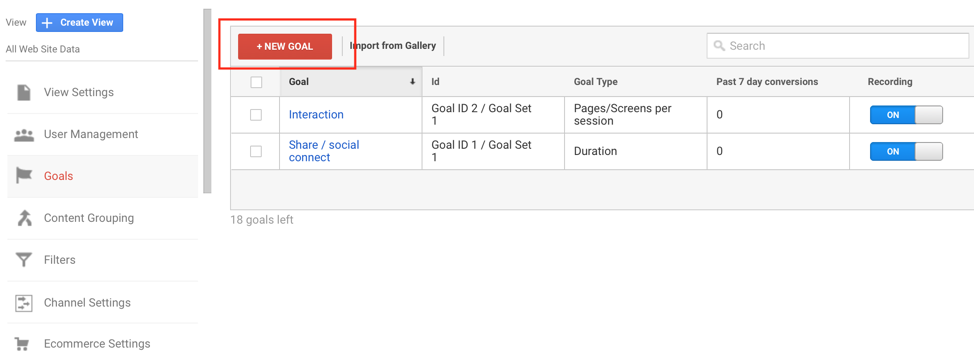
From the Goals menu in Google Analytics, click the “+ New Goal” button to open the new goal template.
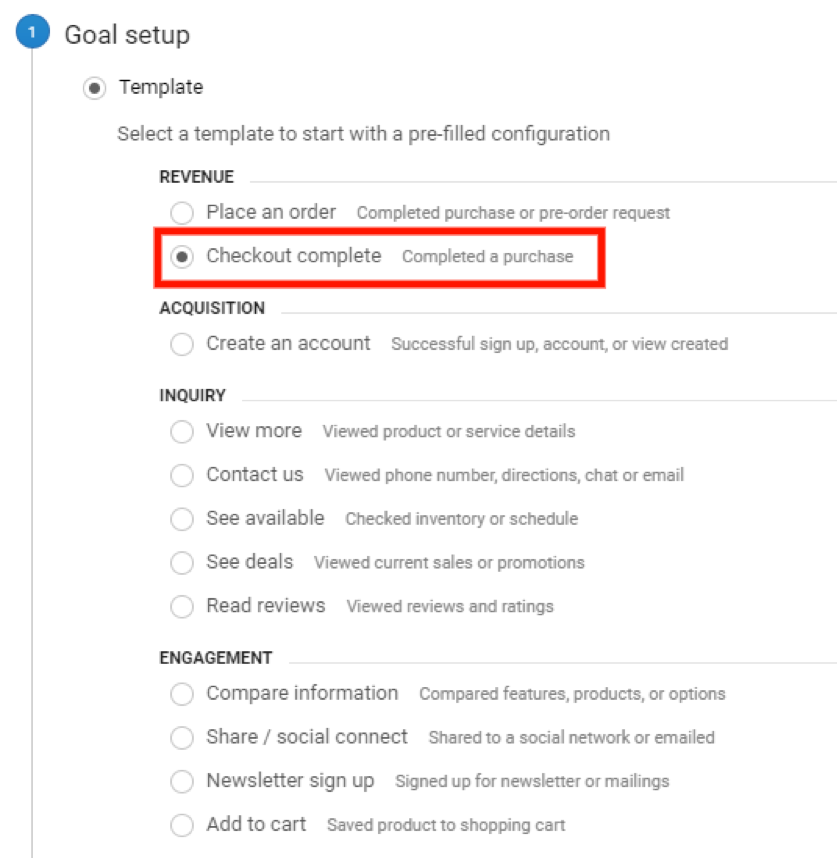
At the top of the goal template, you’re given a list of template options. For this tutorial, we chose to set up a completed purchase confirmation page — the second option on the list.
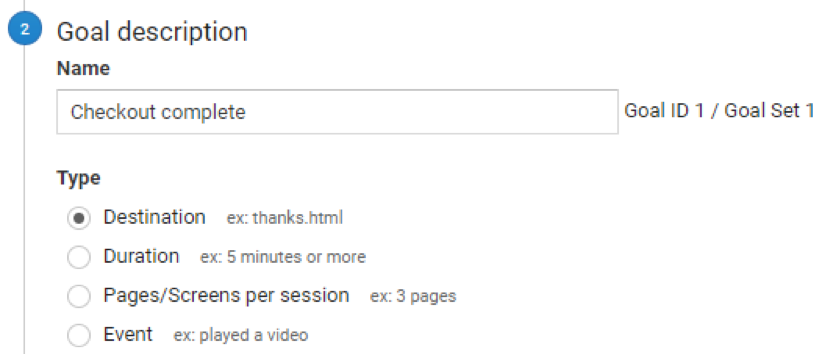
Next, create a name for your confirmation page goal. For the tracking goal type, choose “Destination” since a confirmation page is the URL destination that marks the completion of a conversion.
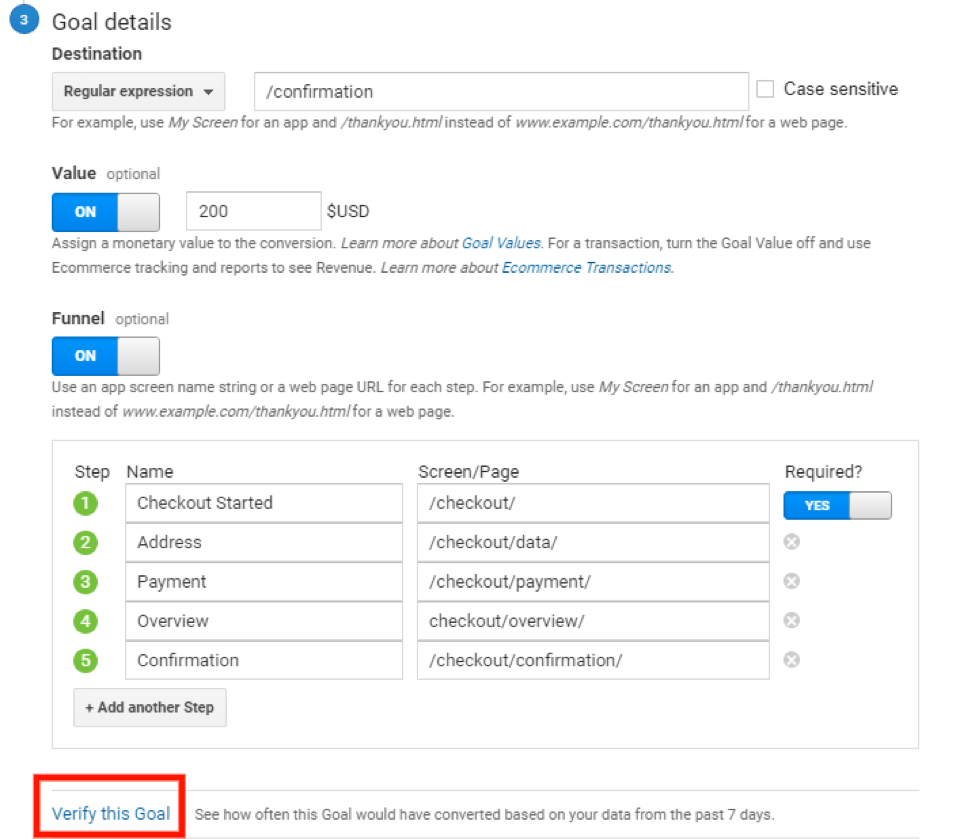
In the third section of the goal template, you’ll need to provide a destination and value, and then outline the conversion funnel for the tracking goal.
The destination is similar to a label and how the goal will be shown in Google Analytics. Think of it as a URL suffix and choose something simple that’s representative of the confirmation page you’re tracking.
The value is, quite simply, a monetary value assigned to the goal you’re tracking.
The funnel refers to your conversion or sales funnel. A confirmation page will likely take the final position in the funnel. The screenshot above shows how the funnel section will look when set up properly.
Finally, click “Verify This Goal” at the bottom.
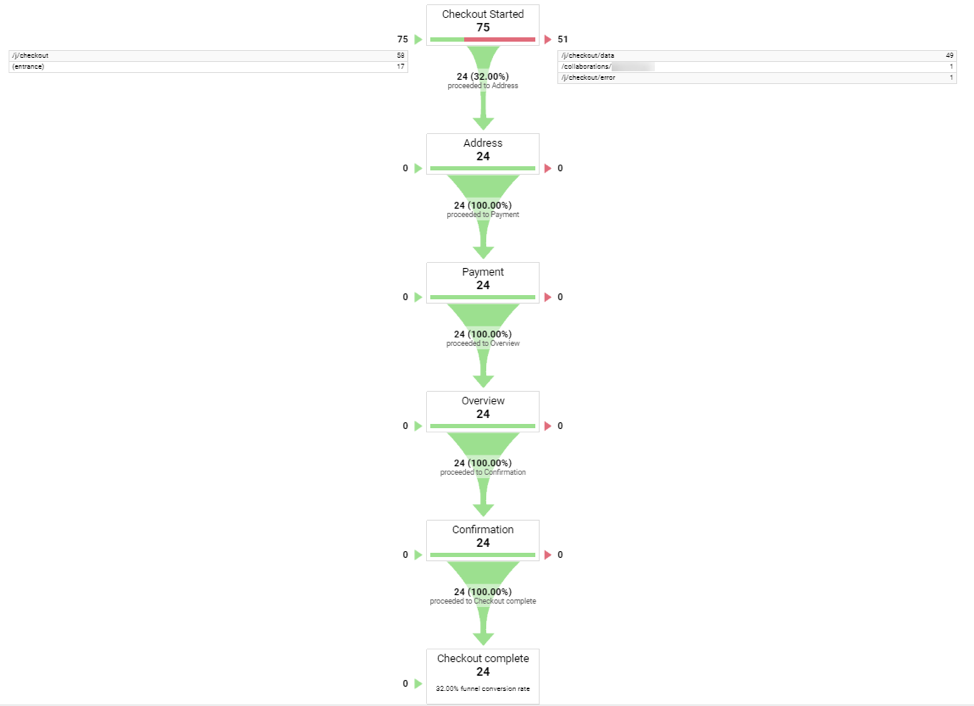
Verifying your goal will manually filter your Google Analytics data from the past seven days through your new tracking goal to tell you how many hits you would’ve gotten during that period. When you see numerical values for every step of the funnel, your confirmation page tracking goal is functional.
Goal: Form Submissions
There are a number of different uses for forms on an ecommerce site. For instance, many sites use forms for newsletter signups and as a convenient way for users to contact the company. You can also set up a form so leads can request a quote for made-to-order products and services.
Just as there are multiple uses for forms for your ecommerce site, there is more than one way to set up form submission goals in Google Analytics. First, if you use a confirmation page as a follow-up to a form submission, you would set up a form submission goal in much the same way as a confirmation page goal (outlined above). Alternatively, you can set up form submissions as Google Analytics events, and then use a form submission event as a tracking goal.
Before setting up a form submission goal, you need to set up form submission as a trackable event. For this step, we recommend using Google Tag Manager.
How to Set up a Form Submission Goal
Once you have completed that setup in Google Tag Manager, return to Google Analytics, open the Admin menu, click “Goals” in the View column, and click the “+ New Goal” button.
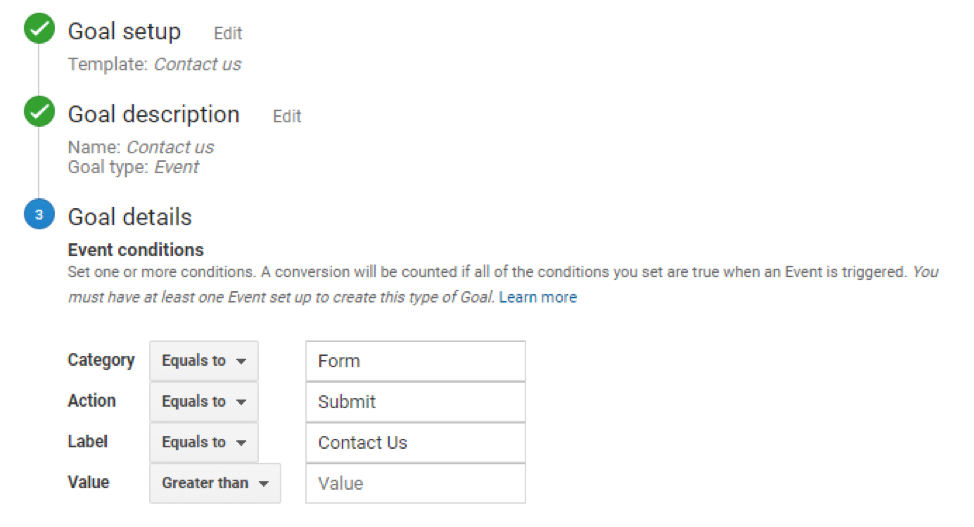
In the screenshot above, you can see the options we chose while setting up a tracking goal for a contact form. In the first section, we chose the “Contact us” template. In the second section, we named the goal “Contact us” and selected “Event” as the goal type. Finally, we completed the details for the goal by filling in the category, action, and label. Since a form submission doesn’t equate to a sale, no value was assigned. However, you may choose to assign a value to an inquiry. It’s simply a matter of preference.
Goal: Products Added to Cart
Adding products to the shopping cart is another important goal to track and is a prerequisite for a purchase. The idea is to see how many people are adding products to the shopping cart so you can compare that to how many of those added products end with transactions. Doing this gives you an idea of how often users are abandoning their shopping carts.
There are two ways to set up Added-to-Cart goal tracking in Google Analytics, depending on how your ecommerce site is setup. If there’s some sort of confirmation page when a product is added to the shopping cart, then you’d follow the same steps as you would for a confirmation page. But if adding a product to the shopping cart isn’t followed by a confirmation, you’ll need to set it up as a triggered event with Google Tag Manager.
How to Set up an Added-to-Cart Goal
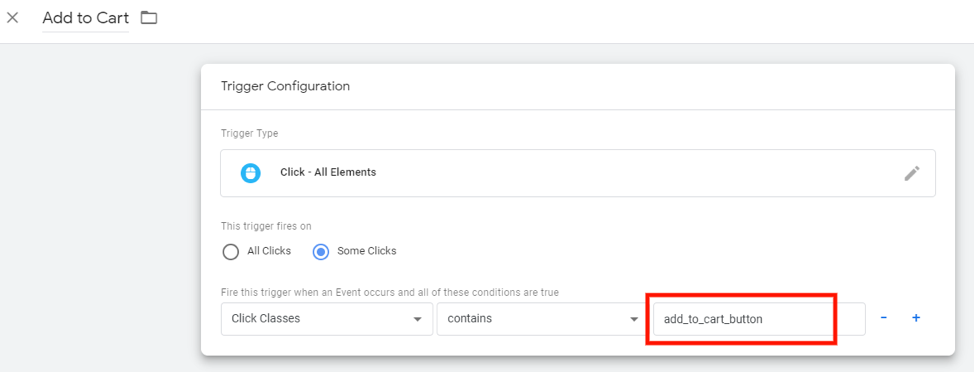
As you configure the trigger for the event in Google Tag Manager, you’ll want to select “Click – All Elements” as the trigger type. This ensures that mouse clicks will trigger the event. Next, select “Some Clicks” for what initiates the trigger and input the class and conditions for the event trigger. Use the + and – buttons to the right to add or remove triggers as needed.

You can see how these settings are reflected in the underlying code on your site by right-clicking on your “Add to Cart” button and selecting “Inspect element.”
![]()
After configuring the tracking event trigger, your Added-to-Cart goal is ready to start tracking.
Event: Abandoned Carts
When a cart is abandoned, it means the person who added the product to the shopping cart has changed his or her mind. On average, 69.57% of shopping carts are abandoned before purchases are made. With so many sales falling through the cracks, cart abandonment is a very important metric for ecommerce business owners to track.
It’s worth noting, though, that a tool like Jilt that can act on cart abandonment data can be especially useful. In addition, Glew.io can actually show which products are being left abandoned in the shopping cart most frequently and makes it easier to identify potential roadblocks in the buyer’s journey. Both Jilt and Glew.io are tools that are included with Managed WooCommerce at Nexcess.
How to Set up an Abandoned Cart Event
Abandoned cart event tracking is most commonly done automatically when you have ecommerce enabled in Google Analytics.
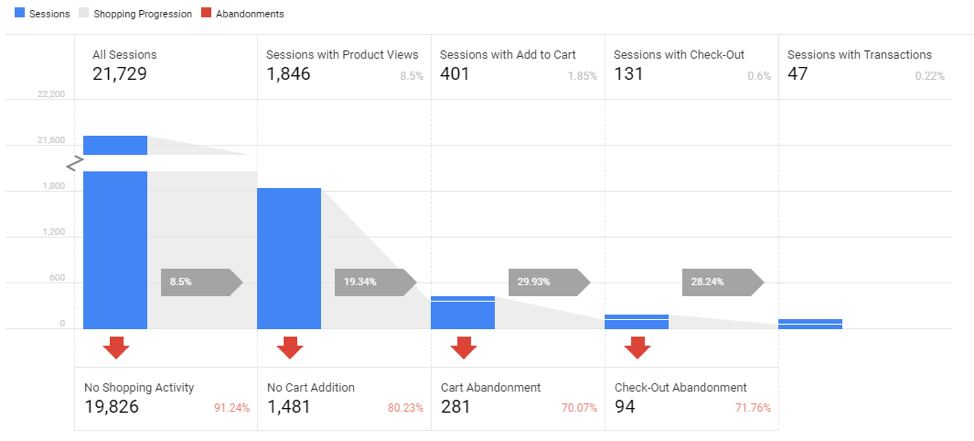
To access your abandoned cart events, navigate to ecommerce > Cart Behavior. Not only does this show instances of cart abandonment, but you get to see instances of no products being added to the cart and instances of check-out abandonment. The idea is to get a concise visual representation of how many sales are lost at different points in the buyer’s journey.
Event: Video Views
Videos are the most popular, high-converting form of digital content today which is why setting up tracking for video views is important for ecommerce businesses. With Google Analytics and Google Tag Manager, you can set up video tracking for instructional/information videos, video reviews, and product launch videos that are available on your website.
Tracking video view events on your site is particularly useful when combined with an ecommerce analytics tool like Glew.io for more insightful customer analytics. When you track video views, you can compare that figure to metrics like your pageviews, unique visitors, and conversions for a clearer picture of how users are engaging with your online store.
How to Set up a Video View Event
The most effective (and easiest) way to set up video view events is to use Google Tag Manager. And if your videos are hosted on YouTube, then Google Tag Manager takes just moments to set up.
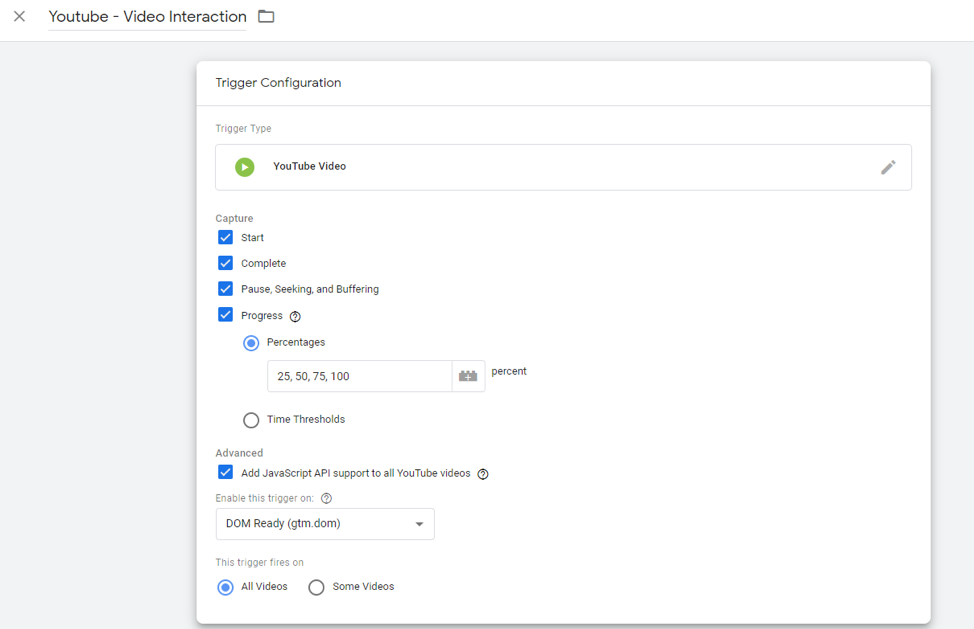
In the screenshot above, you can see a pretty standard trigger configuration for a video view event. For the trigger configuration, all four capture options are selected including progress percentages in 25-percent intervals, but you can set it to track as much or as little as is helpful for you.
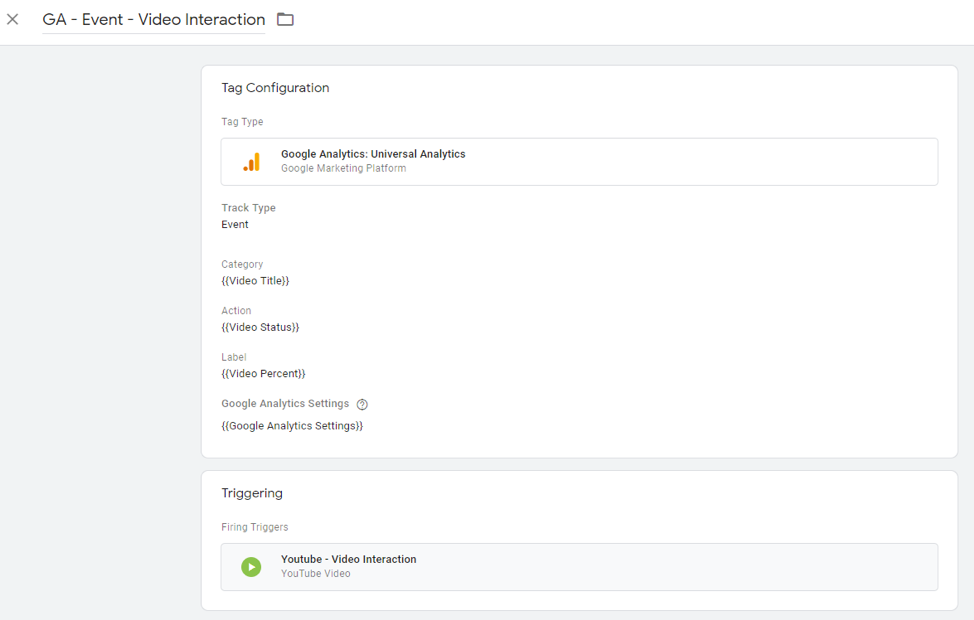
Once you have finished with trigger configuration, the tag configuration for your video view event should look similar to the screenshot above.
After you’ve finished setting up your video view event in Google Tag Manager, those events will be reported in Google Analytics. You can monitor instances of video view events in Behavior Event Reporting.
Nexcess Managed WooCommerce Hosting Comes Paired With Glew.io for Comprehensive Customer Insights
Nexcess is your premiere hosting provider, offering high-quality, performance-focused hosting plans for ecommerce businesses of any size. However, when you choose Nexcess Managed WooCommerce Hosting, you’re not just getting the best in speed, performance, and reliability at a great price: You’re also getting tons of extras, like Jilt for cart abandonment and Glew.io, a comprehensive ecommerce analytics program. So when you want the best for your growing ecommerce business, choose Nexcess Managed WooCommerce Hosting.
Learn more and get started today.

